
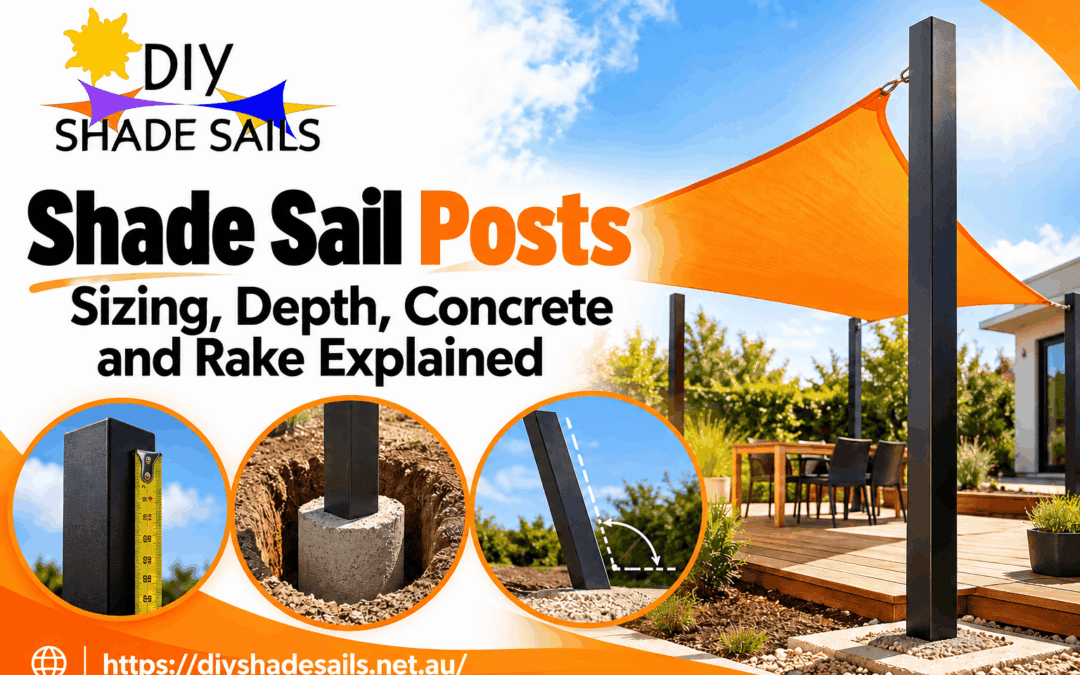
Shade sail posts carry far more load than most people expect, and the wrong post or footing can lean, crack or pull out in the first big Brisbane storm. The right size and depth depend on more than your sail’s dimensions: height, wind, soil and fixing layout all matter.
Quick answer:
the higher you go, the deeper the footing, the bigger the post. Shade sail posts need to be sized for the sail’s dimensions, fixing height, wind exposure and ground conditions. As a general trend, taller posts need a stronger section and a deeper footing. A 100 × 100mm steel SHS post in a footing 400 to 450mm wide appears in several Australian supplier guides, but as a planning reference, not a universal specification. Guides differ because they assume different sail sizes, post heights, soils and wind exposure.
The One Rule That Governs Everything
Our shade sail planning guide puts post height first: the higher the fixing point, the larger the post and the deeper the footing need to be. That’s because a tensioned sail passes the load at each corner down a chain, from the fixing point through the post and footing into the soil.
So think of shade sail posts, footings, soil and sail as one connected system. Soft ground can let a heavy post tilt, and extra depth won’t help a post too slender for the load. A deep footing won’t save a thin post that bends. The sail’s size, shape, height and tension all change the load, and wind adds sudden extra force on top. No single post size or footing depth can promise storm resistance. The whole system has to suit your site.
Choosing Post Material and Size
Galvanised steel is a common choice for shade sail posts, because it gives a lot of strength in a slim section.
Galvanised Steel vs Timber vs Aluminium
| Material | Strengths | Watch out for |
|---|---|---|
| Galvanised steel | High strength in a slim section; galvanising slows rust | Wall thickness matters as much as width; protect cut ends and the ground line |
| Treated timber | Natural look; easy to fix fittings to | Needs a much bigger section; can rot, crack, twist or drift out of line |
| Aluminium | Light and rust-free | Can’t replace steel size-for-size; use only a section rated for sail loads by the maker or an engineer |
Timber is weaker than steel, so it needs a bigger cross-section for the same job. Published timber minimums range from about 100mm (Sailmaker, H4 or H5 treated) to 125mm (Durashield) and 200mm or more (Peninsula Shade Sails). Timber shade sail posts can still work. It just isn’t a like-for-like swap for steel.
Common Post Diameters and When to Step Up
A 100 × 100mm square hollow section (SHS) with a 3 to 4mm wall appears in several Australian supplier guides as a residential reference for shade sail posts. It’s a planning reference, not an approved specification for your sail.
A round post is sized by its outside diameter, such as 90mm or 139mm. A square post is sized by its outside width, such as 100 × 100mm, plus its wall thickness.
Supplier references (not approved specifications):
- Durashield: 90mm round or 90 × 90mm square minimum, 4mm wall
- Peninsula Shade Sails: 100 × 100mm SHS or 139mm round
- Coolaroo: from 100 × 3mm up to 125 × 5mm
Section size, wall thickness, unsupported height, connections and site loads have to be assessed together. A bigger section isn’t automatically enough, and no example here suits every sail. Have shade sail posts specified for your actual sail and site.
How Deep Should Shade Sail Post Holes Be?
The guides we compared put footings for shade sail posts between 800mm and 1,600mm deep, depending on post height, sail size and ground. They differ because each makes different assumptions.
Footing Depth vs Post Height
Two numbers often get mixed up:
- Footing depth: how deep the concrete-filled hole goes
- Embedded length: how much of the post sits inside that concrete
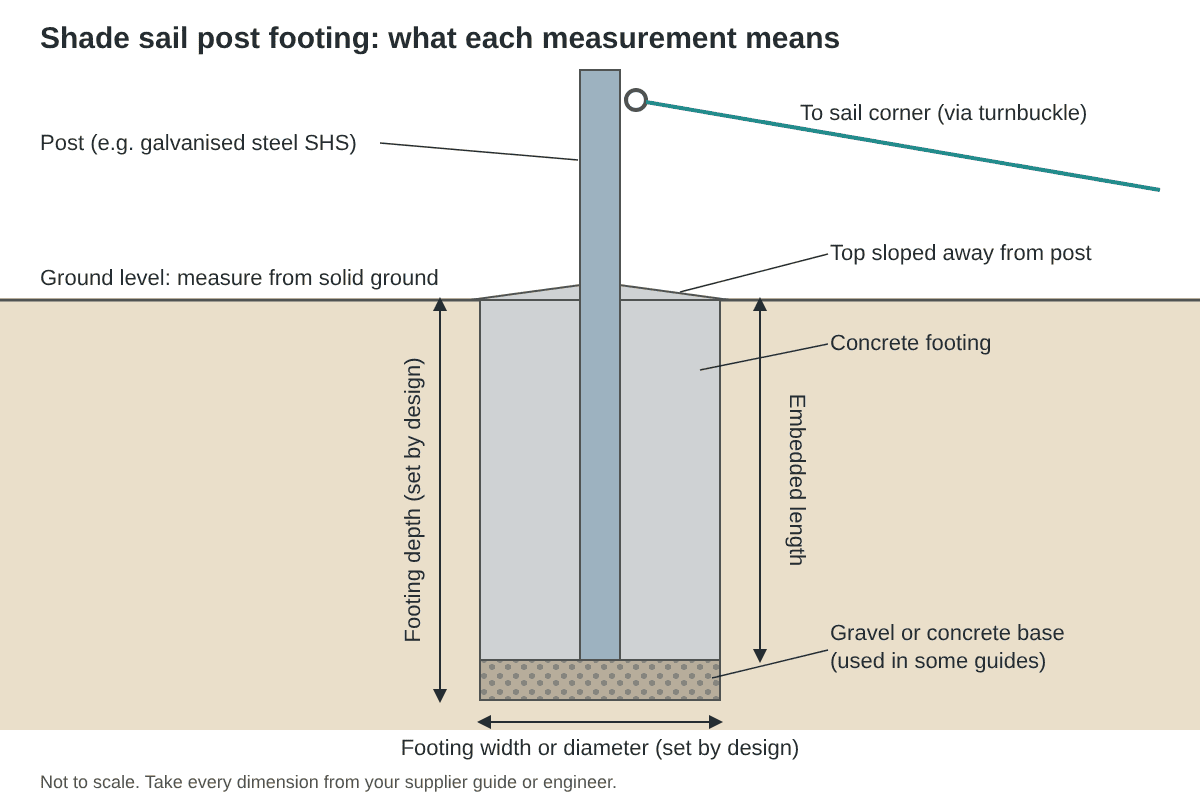
For shade sail posts, the simplest rule of thumb is to bury about one-third of the post’s total length. A 3.6m post would sit 1.2m in the ground with 2.4m above. Other guides work from sail size or post height instead:
| Source | Based on | Example depths (supplier recommendations) |
|---|---|---|
| Durashield, Sailmaker, Shade Matters | Sail size | 800mm for a 3m sail; 1,200mm for 5m and larger (400mm square hole) |
| Peninsula Shade Sails | Post height | 1,000mm (up to 2.5m); 1,200mm (2.6–3.0m); 1,400mm (3.1–3.9m); 1,600mm (4.0–4.5m); 450mm diameter |
| Coolaroo | Sail size and fixing height | 800–1,200mm; 450mm diameter |
| Bunnings | One general method | 800mm deep; 400mm square |
| Our planning guide | Post height | Minimum 1,000 × 300mm; 1,200–1,500mm for a post 4m out of the ground |
Don’t choose a depth from this table alone. Use the relevant supplier guidance as a starting point, then confirm the footing design for your site.
Peninsula bases its depths on solid soil and moderate wind. Taller shade sail posts catch more wind, which is why depth climbs with height.
Soil Type Changes the Answer
Ground type changes how a footing holds:
- Firm, undisturbed ground gives the most grip.
- Reactive clay can shrink and swell as it dries and wets.
- Loose fill or sandy soil offers less resistance.
- Saturated ground loses strength after heavy rain.
- Sloping sites leave less soil in front of the footing.
Brisbane has plenty of clay, but that doesn’t mean every Brisbane site needs the same depth. Measure depth from solid ground, not turf, mulch or loose fill. If your soil is uncertain, your site is exposed or your sail is large, get site-specific advice before you dig.
Concrete: Mix, Volume and Curing Time
Concrete locks shade sail posts into the ground, so use a structural mix, fill the hole fully and let it cure before loading. Durashield and The Shade Sail Shop give 20MPa as a minimum, while Peninsula Shade Sails recommends 25MPa or more. For public parks, the Sunshine Coast Council shade sail specification requires at least 25MPa, or a strength nominated by a registered engineer (RPEQ). None of these is a universal rule for a Brisbane backyard.
Worked example (illustrative calculation): a hypothetical 5m sail on a 100 × 100mm SHS post, in a round hole 450mm wide and 1,200mm deep. These values come from supplier guides, not an engineered design.
- Radius = 0.225m
- Depth = 1.2m
- Volume = π × r² × h = 3.1416 × 0.225² × 1.2 ≈ 0.191m³
That’s the gross volume per hole, or 0.76m³ for four posts. The post takes up a little of that space, but an uneven hole usually takes more. For a square hole, use length × width × depth: a 400 × 400 × 800mm hole is 0.128m³. This is a materials estimate, not a footing design.
Shape the concrete top to shed rain away from the post. Durashield and The Shade Sail Shop suggest 48 hours before tightening the sail. That’s a minimum, not full strength. Concrete keeps gaining strength for weeks, and its MPa rating is measured at 28 days.
The Star Picket Trick Our Installers Use
Our planning guide describes driving a star picket into the base of the footing as an extra anchor. No engineer has checked this method for this guide, so only try it if a structural professional approves it for your site.
What all shade sail posts need is temporary bracing while the concrete cures. A typical setup, similar to the timber-and-clamps method in the Bunnings guide:
- Two braces at right angles, so you can check plumb and rake in both directions
- Brace ends fixed to stakes, such as star pickets, driven into firm ground clear of the hole
- A level check after pouring, and again before the concrete stiffens
- Braces left in place until the specified curing time has passed
Find buried cables and pipes before hammering in stakes.
Rake: Why Posts Lean Away From the Sail
Rake is a slight backward lean set into a post when it’s concreted. Some designs lean shade sail posts away from the sail’s centre, in line with the direction the corner pulls. Under tension, the post can then flex towards the sail without ending up leaning inward. Our planning guide also aligns each post to split the sail’s corner angle in half.
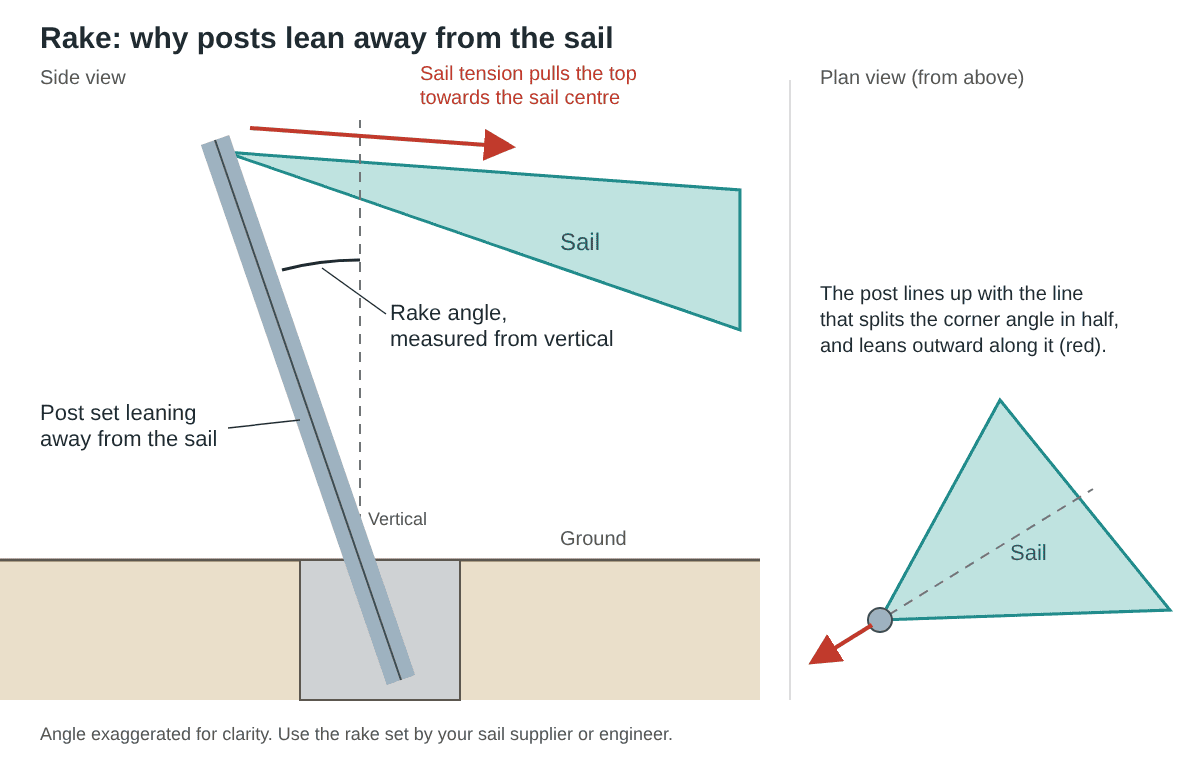
How Much Rake, and Why It Matters Under Tension
Published rake figures for shade sail posts vary:
- 2–5°: The Shade Sail Shop
- 5°: Durashield, Shade Matters and Bunnings
- 7°: our planning guide
- 10°: Coolaroo’s diagrams
- 5–15°: Sailmaker
- 3–5% slope: Peninsula Shade Sails
Check the units: 5° of lean equals roughly an 8.7% slope, whereas a 5% slope is just under 3°.
A raked post’s top sits further out than its base, so factor this in when marking holes. Follow your supplier’s or engineer’s specification for the actual angle.
Direct Embedment vs Baseplates
Direct embedment means burying the post in a concrete footing. A baseplate post has a steel plate welded to its base, which is then bolted to existing concrete. Our planning guide calls direct embedment of galvanised posts the professional installer’s bread and butter.
A baseplate only works when the slab or footing below, the anchors, their distance from the slab edge and the welded connection are all designed for shade sail loads. Don’t assume a typical patio slab is suitable.
Direct embedment needs proper design too: the right footing, concrete and corrosion protection at the ground line. Neither method is stronger in every case. Your site, sail loads and what the post sits on decide which works best.
Mistakes That Pull Posts Out of the Ground
Common causes of problems with shade sail posts include:
- Posts too small or thin-walled for their height
- Shallow, narrow or undesigned footings
- Unchecked weak, wet or loose soil
- No temporary bracing while concrete cures
- Water pooling around the post
- Posts set out of line with the sail’s pull
- Baseplates on slabs not designed for the load
- Over-tensioned sails
Before you dig, check for underground services. WorkSafe Queensland advises using Before You Dig Australia, but notes it doesn’t cover private property cables, so check your own plans too.
Ahead of Brisbane’s storms, look over your shade sail posts, hardware and tension. No checklist can prevent every failure.
Frequently Asked Questions
Before you order. Recommendations for shade sail posts differ because suppliers assume different sail sizes, post heights, soils and wind exposure. Treat published dimensions as planning references, then:
- Confirm the sail shape, size and fixing heights.
- Choose fixing points with our shade sail planning guide and get structural advice where needed.
- Check underground services and your property on Brisbane City Council’s City Plan Online, and confirm approvals with a certifier.
- Set post positions to the confirmed design, then measure the actual fixing points using our shade sail measurement instructions.
- Enter those measurements in the custom shade sail price calculator and add shade sail hardware and fittings.
Disclaimer: This is general educational guidance based on our experience making shade sails in Brisbane since 1994, not a structural design. Requirements for shade sail posts and footings depend on your site conditions and loads. Confirm your design with a builder or structural engineer, check planning and building rules for your property, and locate underground services before you dig.
By the DIY Shade Sails team (Brisbane Sailmakers Pty Ltd), makers of more than 25,000 shade sails in Brisbane since 1994. Not yet reviewed by a structural engineer.